iPubsoft Studio provides
Professional PDF Converter, ePub Creator and iPad/iPhone/iPod Tools
How to Transfer Music from iPhone 5S/5C/4S to iPad mini/4/2?

Sep 13, 2013 18:02 pm / Posted by Sebastiane Alan to iDevice Tips
Follow @Sebastiane Alan
The day before yesterday I was received a new iPad as a birthday gift from my parents. I have my iPhone 4S and have a ton of songs on it and I was told I could transfer those to my new iPad. This information makes me surprising. Is that true? If so how do I transfer music from iPhone to iPad?
iTunes offers you several approaches for transferring files from one iDevice to another. However, anyone who has ever synced data with iTunes must learn that their system running is deeply slowed down by using the bulky iTunes. They have to sit in front of the computer and wait for hours until the syncing process finished. What's worse, there are various errors would occur during the transfer which almost makes you crazy. You just wonder if there is any program you can use to help transferring files from iPhone to iPad without iTunes.
If so, here I would like to recommend you iPubsoft iPad/iPhone/iPod to Computer Transfer, which is the best iTunes alternative tool to help you transfer music, videos, eBooks, photos, playlists and more among iPad, iPhone and iPod. It also a good tool to safeguard your data by backing them up on your computer. With its help, you can hassle free to copy music from iPhone to iPad quickly and flawlessly. Below is the detailed tutorial guiding you through the music transfer from your iPhone to iPad.
In the very beginning, you should download free trial version of the iPhone to iPad Transfer to have a try. Mac users can take a look at the iPubsoft iPad/iPhone/iPod to Mac Transfer.


User Guide: Perform iPhone Music to iPad Transfer without iTunes
In the following, we mainly talk about how to perform the transfer on Mac platform. If you are a Windows user, you can install the Windows version of the software and also refer to the guide below. The operations are almost the same.
Step 1. Connect your iPhone to Mac and run transfer
After you get the Mac tool downloaded and installed on your Mac machine, launch it by double-clicking the icon on your Mac desktop. Then, connect your iPhone to the Mac via Apple provided USB cable.
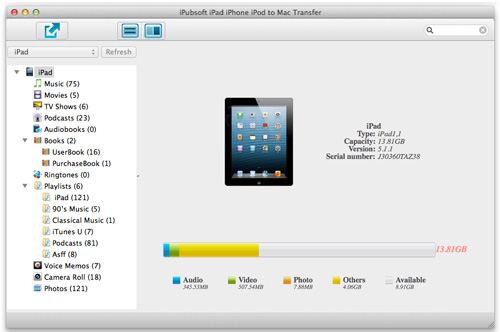
Once the connection is successful, the Mac transfer app will automatically detect your iPhone and your iPhone library and device details will be shown as below. You can preview all data on your iPhone on the left-side column.
Step 2. Select and transfer the music from iPhone to Mac
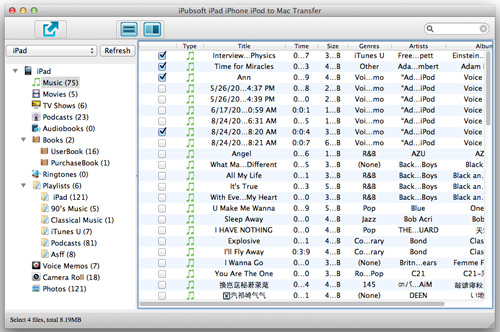
To transfer music from iPhone, you should click "Music" from the files library and preview the contained music files in the right window. Select the songs you want to transfer to your iPad and click ![]() icon.
icon.
Then, there will be a pop-up window asking you to choose an output folder for saving the exported music. Just choose to export them to Mac local folder instantly.
Step 3. Start to sync exported iPhone music to iPad
Disconnect your iPhone from the Mac when the program finishes. Go to the output folder to check the exported songs and then, you can connect your iPad to the Mac and sync these music files to the iPad with iTunes.
Note: All iPhone, iPad and iPod models are compatible with Coolmuster iPad iPhone iPod to Mac Transfer, including iPhone 5C/5S/5/4S/4/3GS, iPad, iPad 2, The new iPad, iPad mini, iPad 4, and iPod touch, iPod touch 4, iPod Shuffle, iPod Nano 3/4/5/6, and iPod Classic. Download the versatile program to have a try.
Hot Product
Hot Articles
- Transfer Video from iPad to PC
- Transfer iPhone Music to PC
- Copy iPod Photos to Computer
- Transfer iPhone Ebooks to Mac
- Export iPad Photos to Mac


