iPubsoft Studio provides
Professional PDF Converter, ePub Creator and iPad/iPhone/iPod Tools
How to Copy Playlist from iPhone to Mac?

Jan 22, 2013 10:33 am / Posted by Sebastiane Alan to iDevice Tips
Follow @Sebastiane Alan
As you know, a playlist usually enables to enjoy music files orderly as you've set. Most mobile devices nowadays, especially the Apple's portable devices, enable users to create playlist for better music playback. Have you built a music playing control list on your iPhone to set the songs order for better enjoyment at your leisure? Is there any well-organized playlist on your iPhone that you want to make a backup on your Mac or import to your Mac iTunes?
To make it easy for you to transfer playlists from iPhone to Mac and then add your iPhone playlist to the Mac iTunes, iPubsoft comes with a well-designed Mac app - iPad iPhone iPod to Mac Transfer to offer you a subtle way to do the task with unbelievable simple steps.
How to copy playlist from iPhone to Mac/iTunes almost becomes a common situation that iPhone users like to encounter for purposes. If you once also have puzzles about how to export iPhone playlists to a Mac or iTunes, then don't hesitate to follow the steps to use this iPubsoft Mac transfer tool to achieve your goal now! It's fairly easy.
Details Steps to Copy and Add iPhone Playlist to Mac iTunes
To copy playlists from iPhone to Mac or iTunes, please first get the iPubsoft transfer tool downloaded and installed on your Mac to be ready for the operations below.


Note: For Windows users, there is the iPad iPhone iPod to Computer Transfer to do you a favor to sync iPhone playlist to a computer that runs Windows system.
Step 1. Connect iPhone, Run Transfer
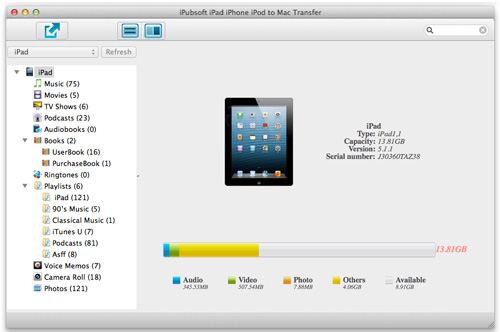
First of all, link your iPhone to the Mac with a cable. Then launch the transfer tool you've installed. This Mac transfer app enables an auto-detect function of the connected iOS device. So, once you start it, it will detect your iPhone in seconds and then list all the transferrable files of your iPhone in clear categories at the left panel of the program interface.
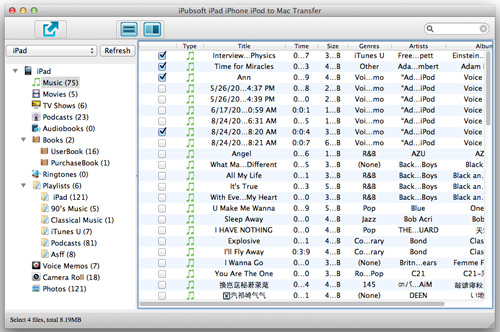
Step 2. Select and Export iPhone Playlist to Mac
Go to the left iPhone library to select the "Playlist" category, and choose the playlists you want copy to the Mac. Once you've selected the wanted playlists, you can then click the ![]() button to export them to your Mac local folder.
button to export them to your Mac local folder.
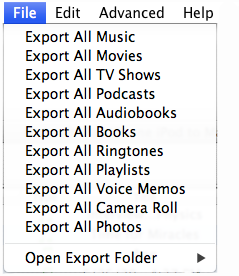
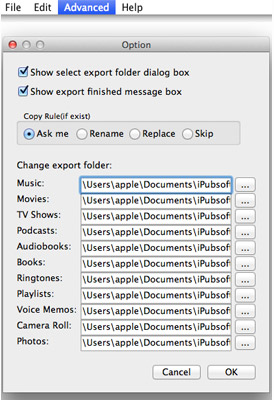
Tips: If you have the plan to copy all your iPhone playlists to the Mac, then please click the "File" menu on the top to select "Export All Playlists". Then the transfer tool will kick off a complete iPhone playlist to Mac transfer. By the way, if you want to export the iPhone playlist to a specified Mac local folder rather than the default one, then you can also click "Advanced -> Options" to change the export file folder before you start the transfer process.
Step 3. Add iPhone Playlist to Mac iTunes
Once the transfer process is completed, you can click "Yes" from the pop up export finished message box to enter the export file folder to find and drag the playlists to the iTunes on your Mac.
Tip: If you did't set "Show export finished message box" in the option window, then you can click "File -> Open Export Folder" to locate the iPhone playlists and add them to your Mac iTunes.
It's fairly easy, right? Don't hesitate to try it out for yourself now!


