iPubsoft Studio provides
Professional PDF Converter, ePub Creator and iPad/iPhone/iPod Tools
iPhone 4S/5 Tips - How to Export iPhone Camera Roll to Mac?

Jan 10, 2013 5:55 pm / Posted by Sebastiane Alan to iDevice Tips
Follow @Sebastiane Alan
Have an iPhone 4S or the newly iPhone 5 in hand? Have shot many great photos and videos with your iPhone? Want to export these iPhone camera roll files to your Mac so as to release the storage space of your iPhone for taking more fantastic images and video recordings? If you are looking for an effective way to select and transfer those well-take camera roll files from your iPhone to a Mac, then you should not miss the simple to operate solution to be introduced here.
In the following portion of this article, we will focus on the detail description of how to export iPhone camera roll to Mac with a specific transfer tool, iPhone to Mac Transfer. This is a full-featured transfer tool for iPhone users to copy wanted files to Mac easily and quickly rather than using the iTunes to make a full backup of all the files for a long process. With it, you are empowered the ability to select your wanted photos, movies, songs, and more for a quick transfer from iPhone to Mac in a few operations.
The steps below rightly show you the detail iPhone camera roll to Mac transfer process lead by this software. Just go ahead for a detail check for yourself now!
Step-by-Step Tutorial to Transfer iPhone Camera Roll to Mac
To go through the camera roll files transfer from your iPhone to Mac, you should first ensure you've got and installed the transfer tool on your Mac.


Note: If you are a Windows user, then you can just get the Windows version of iPhone to Computer Transfer and also follow the steps below for a try. The whole transfer process is quite similar.
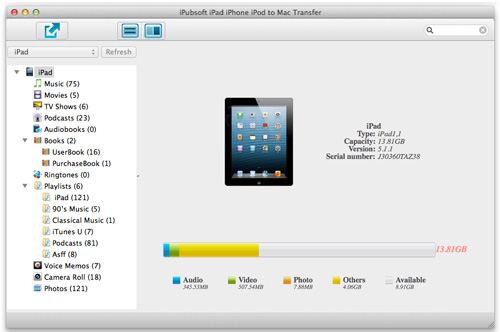
Step 1. Connect iPhone to Mac
Before you run the iPhone to Mac Transfer tool on your Mac, please first ensured that you've connected your iPhone to the Mac successfully. If not, the program will be unable to detect your iPhone automatically when you launch it.
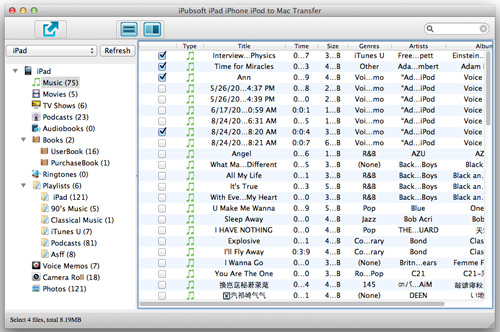
Step 2. Select Camera Roll Files to Transfer
All the files that can be transferred by this program on your iPhone will be detected and listed in categories clearly in the left panel of the software. Just go ahead to click the "Camera Roll" option from the left categories to unfold all your iPhone taken photos and videos in the right window. And then mark the checkbox for the camera roll files you want to transfer.
Step 3. Export iPhone Camera Roll to Mac
Now, it is coming to the last step for the whole transfer. Just move your cursor to over the ![]() from the left top to export all your selected iPhone camera roll items to Mac locally.
from the left top to export all your selected iPhone camera roll items to Mac locally.
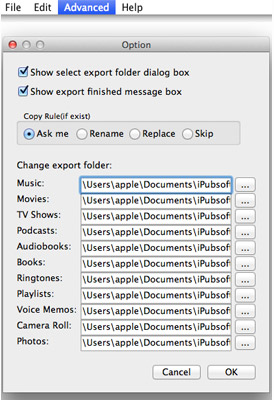
Hints: The steps above are the basic operations for the iPhone camera roll to Mac transfer process. If you once want to export your iPhone taken photos or video clips to a specified folder on your Mac, then you may also need to adjust the export destination from "Advanced -> Options" before you click on the ![]() .
.
Ok, you've made a copy of your iPhone wanted camera roll files to the Mac. And then you can delete these backed up files from your iPhone to free up more space for taking more photos and video clips. If you haven't tried this easy solution yet, then don't hesitate to try it out for yourself now! You'll be excited with it after tried once!


