iPubsoft Studio provides
Professional PDF Converter, ePub Creator and iPad/iPhone/iPod Tools
Easy Method to Sync iPhone Playlists to Computer

January 21, 2013 2:56 pm / Posted by Sebastiane Alan to iDevice Tips
Follow @Sebastiane Alan
You can put your media files on your iPhone onto different playlists so that you can play these video or music files according to the unique genre. Many iPhone, iPad and iPod users, no matter novice or advanced users feel that it is very important to backup iPhone playlists to computer for backup in case of iPhone crashed. Then, you just wonder if there was a way of getting all the media files in the playlist on your iPhone on to the computer, legitimately.
Surely here is a way! We strongly recommend our product named iPhone to Computer Transfer which is specially designed to help you sync iPhone playlists to computer easily and fast! More than that, it can even transfer other files, including videos, music, books, photos, etc. from iPhone, iPad and iPod to computer without any hassle. Just refer to this article and learn how:
How to Transfer iPhone 5/4S/4 Playlists to Windows PC?
Step 0: Launch the software
Free download, and install the software on your computer. The downloading link for iPhone to Mac Transfer is also provided. Just download according to your computer operation system. Run the installed program to get ready.


Step 1: Connect iPhone to the computer
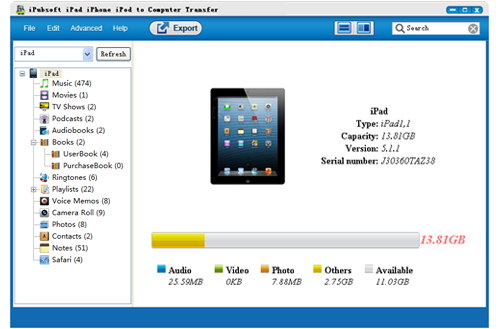
Connect your iPhone to computer with USB cable line. The program will automatically detect your device and then you can see all information about your iPhone on the main interface, including Type, Capacity, Version, Serial Number and Format.
Step 2: Select iPhone playlists to transfer
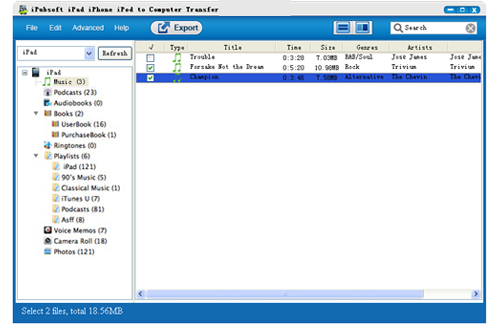
Navigate to the left side of the program, click on the "Playlist" icon in the iPhone library list to open the playlist folder and check the files you want to transfer to the computer. Go to the top-menu bar, click "Advanced" > "Options" to choose an output folder on your computer disk for saving these playlists.
Step 3: Begin to transfer
Check whether all the iPhone playlists are selected. Then, you can click the icon from the top-menu to start to sync iPhone playlists to computer. Several minutes later, all the iPhone playlists will be transferred to your computer successfully. You can then go to open the output folder to view the playlists on your computer.
![]() Download iPhone to Computer Transfer Free Trial Version >>
Download iPhone to Computer Transfer Free Trial Version >>
Hot Product
Hot Articles
- Transfer Video from iPad to PC
- Transfer iPhone Music to PC
- Copy iPod Photos to Computer
- Transfer iPhone Ebooks to Mac
- Export iPad Photos to Mac


