iPubsoft Studio provides
Professional PDF Converter, ePub Creator and iPad/iPhone/iPod Tools
How to Export Playlist from iPad to Mac?

Jan 11, 2013 5:35 pm / Posted by Sebastiane Alan to iDevice Tips
Follow @Sebastiane Alan
Did you create some playlists for your favourites songs or movies on your iPad mini or new iPad? Have you ever thought to copy these iPad created playlists to your Mac desktop for a better enjoyment or further backup? If you have once tried to export your iPad playlists to Mac but not succeed, then you may go through this article to find an easy but good way to transfer playlists from iPad to Mac for specific use.
Since it is difficult to export playlist from iPad to Mac successfully without using a third-party program, here we will draw support from an iPad to Mac Transfer tool to make the task easy. The Mac transfer app we are going to use is a versatile program which you should not miss to export playlists, movies, music, books, TV shows, and more from an Apple iOS device to a Mac.
It comes with an intuitive interface to make it easy for everyone to transfer files from iPad to Mac without any hassle. The steps below exactly show the ease of use of this iPad playlist to Mac transfer tool. Keep on reading to learn the details by yourself now!


Note: If you want to export playlist from iPad to a Windows computer, then you are suggested to try out the iPad to Computer Transfer software for Windows.
Quick Start of How to Transfer Playlists for iPad 2/iPad mini/new iPad Air to Mac
Step 1. Connect device and launch software.
Download and install the Mac transfer tool. Before you run the app after installation, please first connect your iPad device to Mac. Once you start he transfer program, it will take a few seconds to detect your connected iPad for the files transfer.
Step 2. Select Playlist to Export
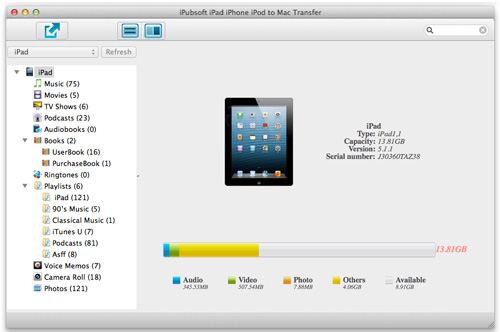
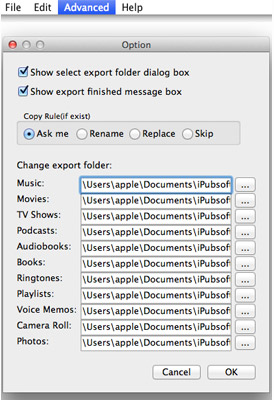
After the detection, you will see an iPad library in the left panel. Click the "Playlists" option from the left library to select the playlists you want to export. And then, please click "Advanced" and choose "Options" to adjust the export folder and define other detail settings as you want. Of course, you can also leave the export options as default.
Step 3. Export Playlists from iPad to Mac
Ok, the final step you should take for the transfer of iPad playlists to a Mac is quite simple that you only need to click the ![]() to transfer your selected playlists from your iPad to the Mac local folder you've set.
to transfer your selected playlists from your iPad to the Mac local folder you've set.
Voila, the task of how to transfer playlists from iPad to Mac can be such an easy process as you've read from above. If you are interested in these easy operations, then you may get the easy-to-use transfer tool to try it out for yourself now!


Hot Product

Hot Articles
- Transfer Video from iPad to PC
- Transfer iPhone Music to PC
- Copy iPod Photos to Computer
- Transfer iPhone Ebooks to Mac
- Export iPad Photos to Mac


