iPubsoft Studio provides
Professional PDF Converter, ePub Creator and iPad/iPhone/iPod Tools
How to Transfer Songs from iPhone to Mac Computer?

December 18, 2012 10:16 am / Posted by Sebastiane Alan to iDevice Tips
Follow @Sebastiane Alan
As a digital mobile phone device, iPhone not only provides users with a convenient way to keep in touch, but also enables users a fantastic way to carry dozens of music for leisure enjoyment anywhere. As we know, it is quite simple to transfer music files from Mac to iPhone with the use of iTunes. As long as your music files are in AAC, MP4, AIFF, or WAV, which are compatible with Apple iOS devices, you can easily sync the files from your Mac to iPhone via iTunes. However, the versatile iTunes can do nothing for you if you once want to transfer your iPhone songs or music files back to a Mac local.
As a matter of fact, iTunes enables you to transfer those iTunes purchased music files from iPhone to Mac by connecting to your authorized Mac's iTunes and doing "File > Transfer Purchases". For the songs purchased from other sites or copied from CDs, the only way you can get them transferred back from your iPhone to a Mac would be finding a specific third-party program for help. For example, you can use iPubsoft iPhone to Mac Transfer to transfer songs from iPhone to Mac leisurely without considering if the files are purchased in iTunes or got from anywhere else.
If you are looking for a way to simply transfer the music files on your iPhone to a Mac for a backup, then go through the coming up step-by-step guide to have a try now! It rightly tells about how to transfer iPhone songs to Mac computer within simple steps using the specific iPhone transfer tool.
Step-by-Step Tutorial of How to Transfer Music from iPhone to New Mac
To get ready for the iPhone to Mac music transfer, please first get the specific iPhone transfer program and install it on your Mac computer.


Step 1. Start Software
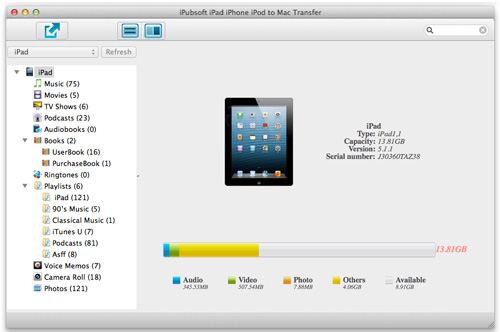
Link your iPhone to Mac with the specific USB cable, and then start the transfer tool on your Mac to let it detect your connected iPhone. Once successfully detected, your iPhone files will be categorized in the left panel as well as detail iPhone info displayed in the right panel.
Step 2. Select Target Songs for The Transfer
Go ahead to the left iPhone list to select the "Music" category. And then you will see all your iPhone stored music files listed in the right panel. Just go to mark the songs you wanna copy to your Mac for a backup.
Step 3. Transfer Songs from iPhone to Mac
Ensure all your wanted music files have been chosen. After that, simply hit "Export" to let the program make a copy of your selected iPhone songs to your Mac local folder easily.
Voila! Transfer music from iPhone to new Mac can be as easy as 3 simple steps. The whole transfer process can be summarized as connect device and start software, select songs, and then start transfer. So easy, right? Then, what are you still waiting for? Just take the chance to transfer your music files from iPhone to Mac right now!


