iPubsoft Studio provides
Professional PDF Converter, ePub Creator and iPad/iPhone/iPod Tools
3 Awesome Methods to Transfer Photos from iPhone to Mac?

July 03, 2013 15:08 pm / Posted by Sebastiane Alan to iDevice Tips
Follow @Sebastiane Alan
Thanks to the built-in camera of Apple iPhone, we are able to capture and store hundreds of self-captured images and photos on its own hard drive. However, the memory of iPhone is limited. You’d better transfer large-sized files from iPhone to your computer for backup so that you can free up more space to save other new data. In this article, we’ll share 3 solutions with the people who need to transfer iPhone pictures to Mac without iTunes.
Choose to read the method interests you:
1: Transfer iPhone pictures to Mac via iPhoto
2: Transfer photos from iPhone to Mac via Preview
3: Transfer iPhone photos to Mac with iPhone to Mac Transfer
Method 1: Transfer Photos from iPhone to Mac with iPhoto (Only for photos taken with iPhone)
Step 1: First of all, you should connect your iPhone to the Mac and you'll see iPhoto will automatically launch normally. If not, you can open the iPhoto manually.
Step 2: iPhoto will open to the Import window and show all the images and videos you shot with the iPhone built-in camera under the "Camera Roll" category. Just select the pictures you want to import into iPhoto.
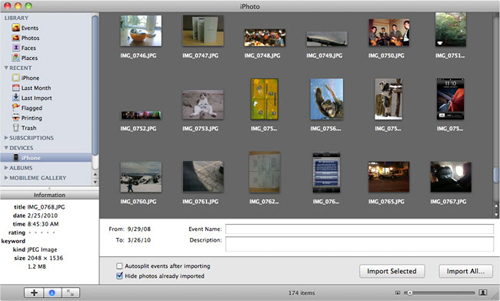
Step 3: Select the "Import Selected" option to transfer the checked photos into iPhoto. Or you can directly drag the photos in the Camera Roll folder and drop to iPhoto.
Method 2: Transfer iPhone Photos to Mac with Preview (Only for photos taken with iPhone)
Preview is another Mac built-in application for you to transfer iPhone photos in Camera Roll to Mac computer.
Step 1: Plug your iPhone into the Mac and launch Preview.
Step 2: Navigate to the File menu and choose "Import from...(iDevice's name)" from the drop-down list.
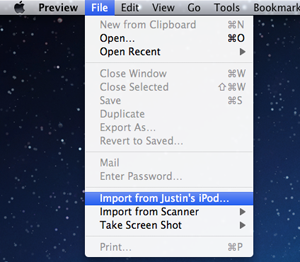
Step 3: Choose the photos you want to transfer to your Mac and click the button of "Import" or "Import All". Then, specify an output location where you want to save these transferred photos.
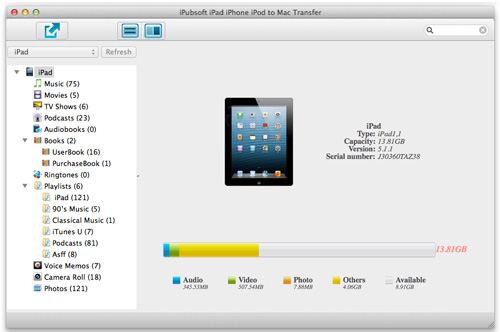
Method 3: Use Professional iPhone Photo to Mac Transfer (For ALL your iPhone images)
As I mentioned above, the first two solutions only work for photos you taken with iPhone built-in camera. If you want to export all iPhone images to Mac, iPhone to Mac Transfer is a good choice for Mac users to transfer iPhone data, including music, movies, books, podcasts, playlists, voice memos, etc. to Mac.
Tips: If you are running a Windows PC, I think you may like iPhone to Computer Transfer.
Step 1: Download and install the program on your Mac. Launch it and connect your iPhone to the Mac. The program will detect your iPhone and show all the contents of your iPhone including videos, audio, photos and more in the list.


Step 2: Open the "Photos" folder to bring up everything in your iPhone Photo Library. Check the pictures you want to copy to your Mac.
Step 3: Click on the export icon ![]() to start transferring photos from iPhone/iPhone 4/iPhone 4S/iPhone 5 to Mac. After a little while, the transferring will be finished and you can view the output files on your computer as you want.
to start transferring photos from iPhone/iPhone 4/iPhone 4S/iPhone 5 to Mac. After a little while, the transferring will be finished and you can view the output files on your computer as you want.
![]() Download iPhone to Mac Transfer Free Trial Version >>
Download iPhone to Mac Transfer Free Trial Version >>


