iPubsoft Studio provides
Professional PDF Converter, ePub Creator and iPad/iPhone/iPod Tools
Download iPad Camera Roll to Mac from iPad Air/iPad mini/iPad 4

Jan 21, 2013 3:13 pm / Posted by Sebastiane Alan to iDevice Tips
Follow @Sebastiane Alan
Question:
"Is there a quick way to copy my iPad taken photos and recorded videos from the camera roll to a Mac? I have bulk photos and video clips saved in my iPad camera roll. Now, I want to export some of these camera roll items to my Mac? Do you know any easy and fast way to make that?"
Are you also trying to copy photos from your iPad camera roll to a Mac for special purpose? Or do you have the interest to figure out how to download iPad camera roll to Mac? For whatever reason you are here, you can go through this article to find out an effective way to select and transfer files from iPad camera roll to a Mac.
If you have needs, you can also use the same method here to get many other files downloaded from your iPad to Mac effortlessly. Because the iPad to Mac Transfer tool, which will be used for the iPad camera roll to Mac transfer process, is capable of exporting music, photos, videos, books and many more types of files from an iPad to a Mac in easy operations. Here is how it works to export iPad camera roll files to Mac.
Guide: How to Transfer iPad Air Camera Roll to Mac?
First of all, please get the transfer tool on your Mac to get ready for copying camera roll items from iPad to a Mac.


Note: For Windows users, please get the Windows iPad to Computer Transfer software to try it out for an instead.
Step 1. Start Software
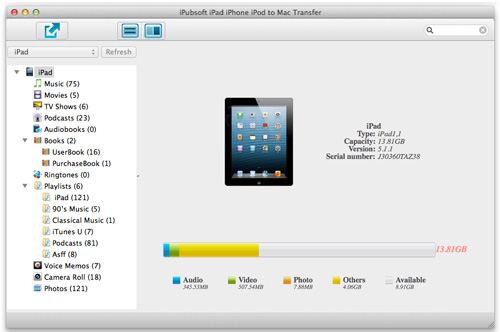
Connect your iPad to the Mac. After a successful device connection, you should then install and launch the Mac transfer tool to let the program detect your connected iPad automatically. A few seconds later, you will see the software interface with the device library listed in the left panel.
Step 2. Define Export Settings (Optional)
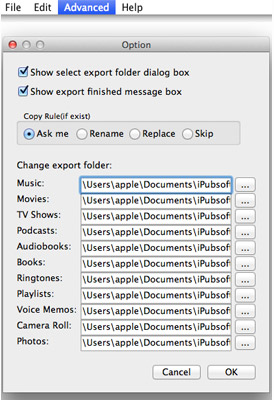
Go to the top menu bar of the Mac transfer tool to click "Advanced -> Options". Then the Option window as below shown will pop up. Just go ahead to select the possible options or change the export folder according to your needs. Remember to confirm the adjustments by clicking the "Ok" option.
Step 3. Select and Transfer Files
Go to the left iPad library to select "Camera Roll" option to pick the checkbox of the files you want to copy to your Mac. And then hit the ![]() to export your selected camera roll items from iPad to the local folder you've set.
to export your selected camera roll items from iPad to the local folder you've set.
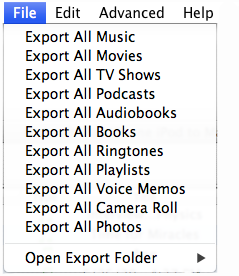
Hint: Once you want to transfer all the files from your iPad camera roll to Mac, then you can click "File" to select "Export All Camera Roll" from the drop down menu to have an entire transfer of the whole iPad camera roll to the Mac.
Ok, the whole transfer process will finished before long in a few seconds or minutes. The process time will depend on how many files you've selected, the more the longer.
Tips: Once you've set in the Option window to let the program "Show export finished message box", there will be a box popping up to prompt you and ask if to open the export file folder directly. You can choose Yes or No rightly according to your needs. If there is not a message box to prompt you after the transfer process, you can also click "File -> Open Export Folder" to locate the files you've exported from your iPad.
Ok, that's all about how to download iPad camera roll to Mac with the specific iPad to Mac transfer tool. Have you got it? Maybe you can try out to evaluate it for yourself now!


Hot Product

Hot Articles
- Transfer Video from iPad to PC
- Transfer iPhone Music to PC
- Copy iPod Photos to Computer
- Transfer iPhone Ebooks to Mac
- Export iPad Photos to Mac


