iPubsoft Studio provides
Professional PDF Converter, ePub Creator and iPad/iPhone/iPod Tools
Transfer Photos from iPhone 6/6 Plus/5S/5/4S to iPad on Mac/Windows

Sep 11, 2013 19:45 pm / Posted by Sebastiane Alan to iDevice Tips
Follow @Sebastiane Alan
People like to use the 8 megapixel camera of iPhone 5 to take photos and transfer these photos to bigger-screen iPad for viewing. That's because iPad only has 5 megapixel camera which is barely satisfactory in capturing photos. However, you just find that iTunes can not help you copy the photos you captured with iPhone to your iPad. Well, never give up a good thought because now we will show you how to export pictures from an iPhone to iPad without iTunes.
To transfer iPhone photos to iPad, you can ask help from third-party software like iPubsoft iPad/iPhone/iPod to Computer Transfer, which is an one-click iPhone file transfer that enables you to transfer all the photos, as well as other files like videos, music, playlists, eBooks and more on your iPhone to the iPad with fast speed and seamlessly. Below is the full guide about how to copy photos on your iPhone to iPad. Mac users can take a look at the iPubsoft iPad/iPhone/iPod to Mac Transfer.
In the beginning, download free trial version of the iPhone to iPad Transfer to have a try.


How to Copy iPhone Photos to iPad on Mac OS X?
The guide below is done on Mac platform. The operations for transferring pictures from iPhone to iPad are almost the same on Windows 8/7/XP with Windows version of the software.
Step 1. Connect your iPhone to Mac and run transfer
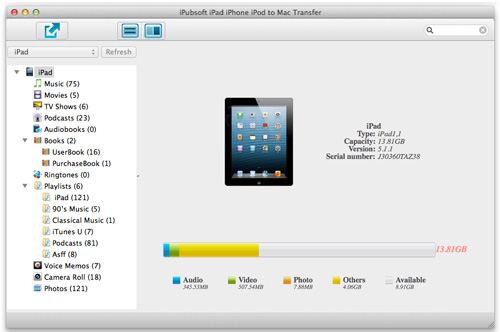
Get the Mac tool downloaded and installed on your Mac machine, launch it to get ready. Connect your iPhone to the Mac via Apple provided USB cable. Once the connection is successful, the Mac transfer app will automatically detect your iPhone and your iPhone library and device details will be shown as below.
Step 2. Preview and select the photos to transfer
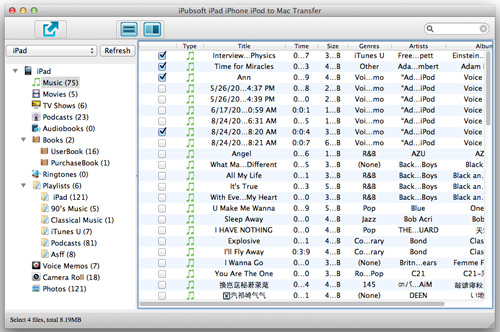
Go to the left sidebar, choose "Photos" and "Camera Roll" from the files library and preview the contained photos in the right window. Select the photos you want to transfer to your iPad and click ![]() icon. Then, there will be a pop-up window asking you to choose an output folder for saving the exported photos. Just choose to export them to Mac local folder instantly.
icon. Then, there will be a pop-up window asking you to choose an output folder for saving the exported photos. Just choose to export them to Mac local folder instantly.
Step 3. Start to sync exported iPhone pictures to iPad
Once the program finished the transfer process, you can then enter the export folder to add the iPhone photos from your local folder to the iTunes directly by dragging and dropping. Then, connect your iPad with the Mac and sync these photos from iTunes to iPad directly.
Additional Information:
Tips 1: If there is a message box popping up to show export finished, then you can directly click "Yes" from the window to enter the exported file folder. If not, you can click "File -> Open Export Folder" to locate the exported iPhone photos.
Tips 2: This iPhone to iPad Photo Transfer works on all iPhone and iPad models, including iPhone 5C, 5S, 4S, 4, 3GS and iPad 4, iPad mini, The new iPad, iPad 2 and iPad.
Tips 2: Indeed, besides transferring photos from Apple iPhone to iPad, this program enables you to transfer files from iPad to iPad, export iPad photos to Mac, and transfer songs from iPhone to Mac.
Hot Product

Hot Articles
- Transfer Video from iPad to PC
- Transfer iPhone Music to PC
- Copy iPod Photos to Computer
- Transfer iPhone Ebooks to Mac
- Export iPad Photos to Mac


