iPubsoft Studio provides
Professional PDF Converter, ePub Creator and iPad/iPhone/iPod Tools
How to Transfer Photos between Android Phone/Tablet and Computer?

Feb 21, 2014 14:11 am / Posted by Sebastiane Alan to Android Tips
Follow @Sebastiane Alan
With the the developments of communication and application technology, more and more great applications have been added into a mobile phone. The latest cell phones have features such as games, music, electronic calendar and other wonderful functions that will help you back up data, transferring important photos, and download files from Internet more conveniently and fast. One of the feature is a tiny camera in the phone that provides users a way to record memorable moments in the form of photos and videos. If you are a video or photo fan, you must like to use your phone to capture videos and photos every time you like. At that way, you must save a batch of valuable photos on your phone, right?
But you must face to the fact that the memory space of a portable device is limited. Too many photos can fulfill the space and prevent you to store new files into the device. What's worse, various instability factors may lead to data loss issue. We kindly tell you that you'd better backup your photos beforehand because accidental deletion, virus infection, device formatting, system corruption and other reasons can cause these precious files lost from your Android phone or Android tablet. Therefore, backing up those pictures from your Android device to computer is essential.
All-in-One Solution to Sync Pictures between Android & Computer!
Also, you may encounter wonderful pictures on the Internet and save them to your computer. Now, you just want to import them to your mobile phone and use it as background picture. Then, is there a tool can do the two-way transferring? The answer is YES! iPubsoft Android Desktop Manager (Windows 8/7/XP/Vista) or Android Desktop Manager for Mac (Mac OS X 10.9 or later), which enables you to transfer photos from any Android mobile or Android tablet to computer for backup, or download photos from web to device, or sync photos from computer to device.
Almost all Android-based devices, such as Samsung can be supported by this software, including HTC, Google, Samsung, Sony Ericsson, Motorola, etc. In addition to the transferring ability, the Android app also features with other great functions. Just download it from the below button to have a try!


Guide on Syncing Photos between Android Device with PC
Step 1: Connect your Android phone to the computer
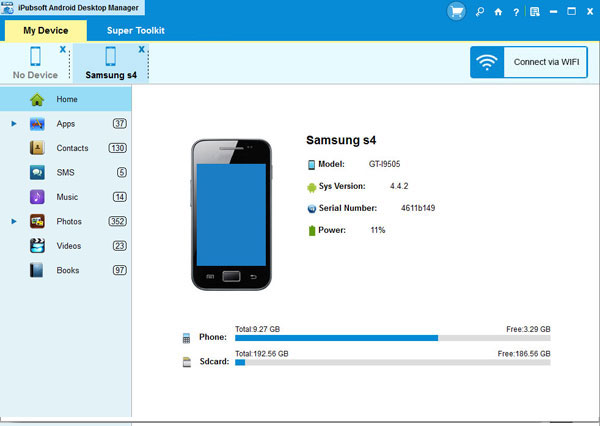
The operations on Windows and Mac are almost the same. Here we set Windows version as example. Download and install the transferring software for Android on your PC. Launch it and connect your Android mobile phone with your computer through a USB cable. Your phone will be detected automatically by the program once it has been connected successfully. You will see your phone displayed in the home window.
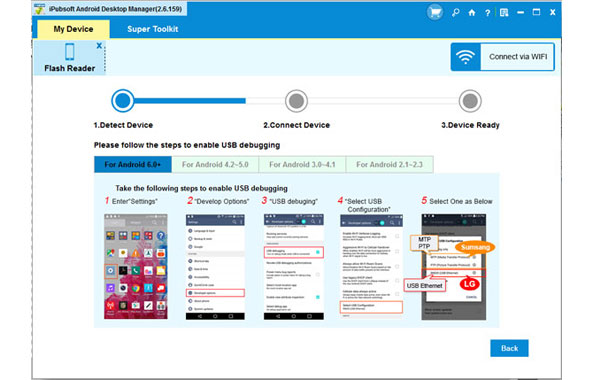
Note: If it is the first time to run this software, you need to enable USB debugging on your phone. If you did it before, you can skip to the next step.
(1) For Android 2.3 or earlier: Enter "Settings" < Click "Applications" < Click "Development" < Check "USB debugging".
(2) For Android 3.0 to 4.1: Enter "Settings" < Click "Developer options" < Check "USB debugging".
(3) For Android 4.2 or newer: Enter "Settings" < Click "About Phone" < Tap "Build number" for several times until getting a note "You are under developer mode" < Back to "Settings" < Click "Developer options" < Check "USB debugging".
Once the USB debugging is enabled, click "Allow" on your phone to allow the program super user authorization when an Superuser Request pops up.
Step 2: Preview and Select the Files You Want to Backup
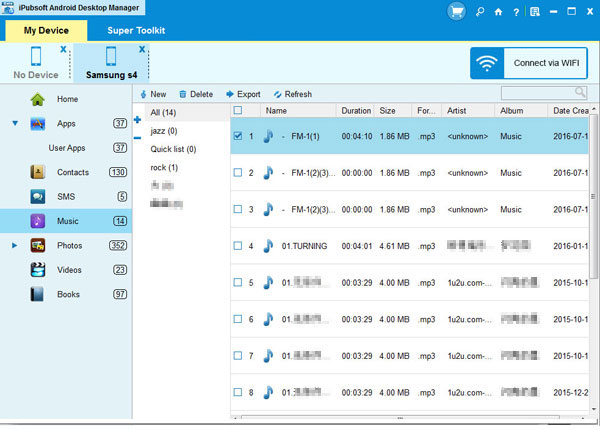
From the below picture, you can see once your phone detected by the software, all files in your mobile phone displayed in the above menu. You can select the Photo tab from the top menu, preview all the contained files saved in your phone or tablet through the right-side window.
Step 3: Start transferring the selected images to PC
Make the target pictures marked and then you can click "Export" button to save them on your computer. A pop-up window will appear, asking you to choose an output location where you want to save the exported files. Just choose an output folder from your computer and then the transferring will be launched.
You can also click on the "Import" button to transfer photos from computer to the Android device.
Recommendation

Hot Articles
- Recover Data from Hard Drive
- Recover iPhone Messages
- Retrive Lost Photos
- USB Drive Data Recovery
- Recover Deleted Email Files


