iPubsoft Studio provides
Professional PDF Converter, ePub Creator and iPad/iPhone/iPod Tools
How to Recover Data from MicroNet Hard Drive?

Aug 13, 2013 17:08 pm / Posted by Sebastiane Alan to Recovery Tips
Follow @Sebastiane Alan
I was performing a system update and bios update to my system. My MicroNet USB flash drive was connected all this time to my laptop might have undergone issues during that time because after these operations I could not anymore access files in that external hard drive. I can simply enter the parent directory but cannot open, copy or paste files. What now?
It is unfortunately that you come across a data loss issue on your MicroNet USB drive. But you are lucky enough because this tutorial is all what you need to recover data from MicroNet hard drive or USB flash drive directly without any professional data recovery skill. You must learn firstly that the lost files are not really lost, they are still on your device but simply become invisible and inaccessible. You can ask a MicroNet data recovery program for help.
iPubsoft Data Recovery or iPubsoft Data Recovery for Mac is such a program that enables you to recover lost, deleted, formatted and corrupted data from any model of MicroNet storage device, such as MicroNet external hard drive, USB flash drive and others. With it, you can easily and wholly recover all file types, including videos, audio files, images, document files, etc. Read on to learn how to recover data from MicroNet hard drive
First of all, please free download the trial version of the MicroNet Data Recovery and try it out by yourself.


3 Steps to Retrieve Files from MicroNet Storage Device
We are going to show you how to recover lost files from MicroNet storage device with Windows version of iPubsoft Data Recovery. Mac users can do the same operations with the Mac version.
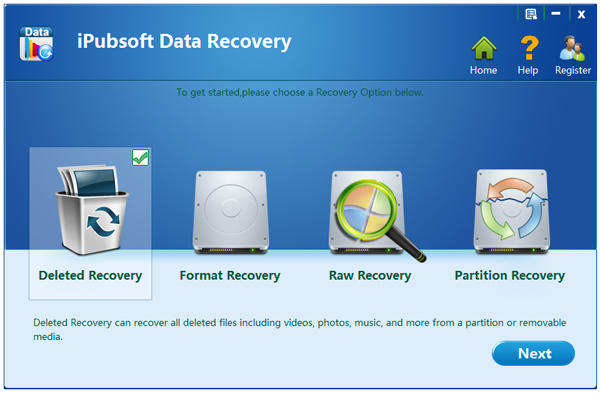
Step 1: Choose A Recovery Mode
Run the MicroNet data Recovery on your computer and you'll get the interface as follow. Connect your MicroNet to the computer and choose a suitable recover mode. Then, click "Next" to continue.
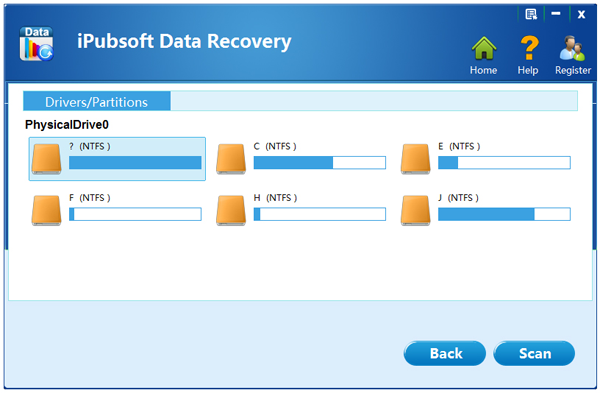
Step 2: Select your camcorder to scan
All partitions and hard drives will be detected and displayed on the program. Just choose your MicroNet hard drive and click the "Scan" button to perform the deep yet quick scan for it. When the scan finishes, all found files will be displayed in the program interface in categories.
Step 3: Recover Data from MicroNet Hard Drive
You can preview these scanned out files and choose those you want to recover. Mark them and then click the big button of "Recover" to save them to your computer.
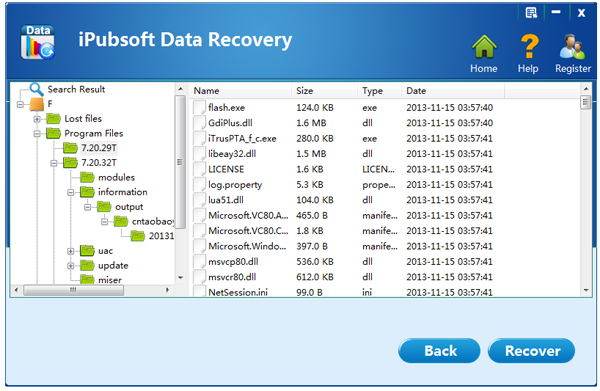
One thing should be paid attention is: Do not save the recovered data back to your MicroNet device during the recovery, to avoid the data overwritten problem.
![]() Download Data Recovery Free Trial Version >>
Download Data Recovery Free Trial Version >>
![]() Download Data Recovery for Mac Free Trial Version >>
Download Data Recovery for Mac Free Trial Version >>
Recommendation

Hot Articles
- Recover Data from Hard Drive
- Recover iPhone Messages
- Retrive Lost Photos
- USB Drive Data Recovery
- Recover Deleted Email Files


