iPubsoft Studio provides
Professional PDF Converter, ePub Creator and iPad/iPhone/iPod Tools
Easy Way to Transfer Playlists from iPod to Mac/iTunes

January 24, 2013 5:50 pm / Posted by Sebastiane Alan to iDevice Tips
Follow @Sebastiane Alan
For iTunes and Apple portable media players, playlists are usually the quintessence for the advanced playback features. The playlists usually can help one to add songs and control the songs' playback orders to make better enjoyment, especially on an iPod touch device. Did you create one or more playlists on your iPod touch for the songs stored on the device? Do you want to copy the playlist from your iPod to Mac iTunes without resetting?
If you are looking for a way to transfer playlists from iPod to Mac, then you are coming to the right place here. In this article, we will focus the rest content on the direction of how to copy iPod touch playlists to Mac with a featured iPod touch to Mac transfer tool. Using this specific Mac transfer tool, you may find the iPod to Mac playlist transfer is fairly an easy task for you.
Furthermore, you can also feel easy to import iPod playlists to Mac iTunes after copying the target items out your iPod touch with this well-designed Mac app. Come on to check the steps below and try it out for yourself now!
Quick Start: How to Copy iPod touch Playlists to Mac?
To get started, please first download and install the transfer tool on your Mac computer.


Hints: For Windows users, you can just get the iPod to Computer Transfer tool to let it do you a favor in the task of how to copy playlist from iPod to computer.
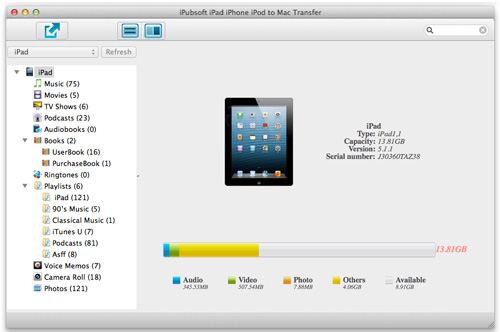
Step 1. Connect Device
Connect your iPod touch to the Mac, and then launch the transfer tool to let it start detecting your connected iPod automatically. In a few seconds, the program will list the detected device info and possible file library in the first interface.
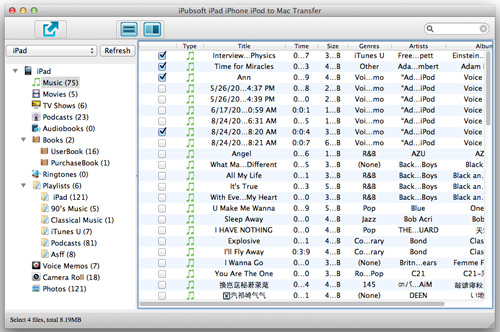
Step 2. Backup Playlists from iTouch to Mac
Choose "Playlists" from the left file library to select the playlists you want to transfer from your iPod touch to the Mac. Once you've chosen your wanted playlists, then you can hit ![]() to export all your selected iPod playlists to Mac.
to export all your selected iPod playlists to Mac.
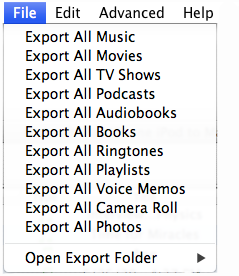
Tips: If you didn't set an export folder before the iPod to Mac playlist transfer, then your iPod playlists will be copied into the default export file folder. You can click "File -> Open Export Folder" to find all the exported playlists. Well, as you can see from the pic below, you can also choose the "Export All Playlist" option from the File drop-down menu to make a copy of all your iPod touch playlists to the Mac local folder directly. By the way, to change the export folder, you can go to "Advanced -> Options" to make it.
Step 3. Add iPod touch Playlists to Mac iTunes
If you want to add these iPod playlist to your Mac iTunes, then you can run the iTunes player and choose "File > Library > Import Playlists" to import your iPod touch playlists into iTunes from your Mac local folder.
Ok, that's all about how to transfer playlists from iPod touch to Mac with an easy-to-use Mac transfer app. Have you learned all the steps of the iPod playlist to Mac transfer? Now you may free download this nice software to have a try for yourself. I'm sure you will be satisfied with it a lot.


By the way, this transfer program also works well in other kinds of files transfer from iPad and iPhone to Mac. So, once you want to transfer iPad music to Mac, download videos from iPhone to Mac, or backup any other files from your Apple iDevice to a Mac, you may not miss the chance to try out this practical Mac transfer app. It would be your good assistant to do the transfer tasks.
Hot Product

Hot Articles
- Transfer Video from iPad to PC
- Transfer iPhone Music to PC
- Copy iPod Photos to Computer
- Transfer iPhone Ebooks to Mac
- Export iPad Photos to Mac


