iPubsoft Studio provides
Professional PDF Converter, ePub Creator and iPad/iPhone/iPod Tools
4 Ways to Download Photos from iPhone to Mac

December 20, 2012 9:55 am / Posted by Sebastiane Alan to iDevice Tips
Follow @Sebastiane Alan
Have some great pictures stored on your iPhone? Want to get these image files from your iPhone 4S/5 to Mac but can't figure out how to accomplish the task? If you are eager to find some quick and efficient ways to transfer your iPhone taken or saved photos to a Mac so as to view them on the big screen, back up them on the more stable Mac, or seriously edit them in the iPhoto, here you are in the right place.
Here in this article, you will find four solutions to download photos from iPhone to Mac for further using or better backup. And these four methods can help you to accomplish the photo transfer task according to two situations.
Situation 1: If you once want to get only iPhone taken photos to a Mac, then the first three ways respectively using the three Mac apps - iPhoto, Image Capture and Preview will meet your needs.
Situation 2: Once you want to get not only your iPhone captured photos, but also the images downloaded/stored in your iPhone Photo Library to a Mac, then you can just go to the fourth method to learn how to download photos from iPhone to Mac with leisure using a specific transfer tool.
You can quickly access to each solution by click the corresponding quick link provided below:
Method 1: How to transfer iPhone taken photos to Mac via iPhoto
Method 2: How to download photos from iPhone Camera Roll to Mac via Preview
Method 3: Get iPhone taken photos to Mac via Image capture
Method 4: Download photos from iPhone Photo Library, Camera Roll to Mac with transfer tool
Method 1: Transfer iPhone Captured Photos to Mac via iPhoto
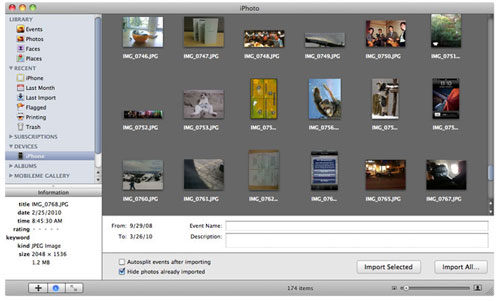
First of all, open iPhoto on your Mac, and connect your iPhone to your Mac with USB cable. And then the iPhoto will automatically launch and open to the Import window in less than 30 seconds.
Secondly, in the opened window, you will see all the images that took by your iPhone listed there. Just go ahead to select as many or all pics as you want, and then hit the "Import Selected" or "Import All" option to copy your iPhone taken photos to iPhoto album on Mac.
Method 2: Download Photos from iPhone Camera Roll to Mac via Preview
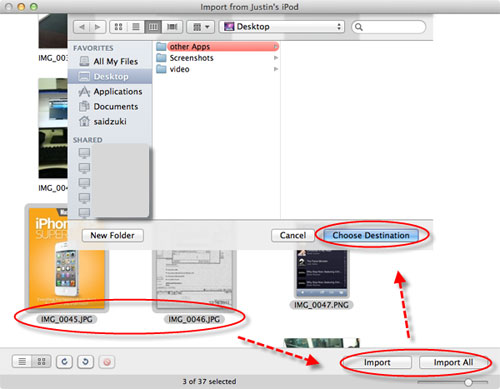
Step 1. Connect your iPhone to Mac over USB. Run Preview and hit the File menu to choose the "Import from (iPhone device name)" option.
Step 2. Move your cursor to choose your wanted iPhone taken photos, and give a simple click on the proper "Import" option according to your actual situation to download photos from iPhone to Mac with ease. Of course, you can define a Mac local folder as you prefer to save the photos by clicking "Choose Destination" in the pop-up window.
Method 3: Get iPhone Taken Photos to Mac via Image Capture
Similar to the above two ways, this solution here can also help you transfer only the photos in your iPhone Camera Roll to the Mac. Detail operations are as below shown.
Step 1. Just go to Applications > Image Capture to launch the app on your Mac.
Step 2. Once you've connected your iPhone to Mac, you will see that your iPhone appeared under the device list. Just choose it and then select the photos you want to import them to your Mac by clicking "Import". Or you can directly drag your selected photos out to any finder window.

Ok, using any method introduced in the above portion, you can feel easy to transfer iPhone photos to Mac as you want. But to be mentioned again here, these three solutions only enable you to transfer your iPhone taken photos. If you once want to transfer more photos rather than iPhone taken images only, then you may try the solution below.
Method 4: Download Photos from iPhone to Mac with Transfer Tool
Want to transfer not only iPhone taken photos, but also iPhone collected pictures to Mac? Then you may get the iPubsoft iPhone to Mac Transfer to download photos from either iPhone Photo Library or Camera Roll to Mac as you prefer. (Note: If you are a Windows user, then iPubsoft iPhone to Computer Transfer would be more helpful for you.)


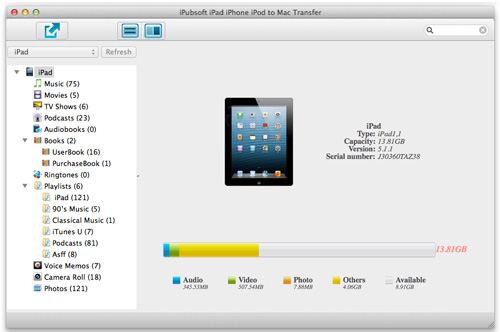
Step 1. Connect iPhone to Mac. Install and launch the transfer tool on the Mac. In seconds, it will detect your iPhone and show you the device details.
Step 2. Just go to select "Photos" or "Camera Roll" option from the left panel to mark the pics you want. And then click "Export" to get your selected photos copied from your iPhone to the Mac.
That's it. The iPhone photos will be then download to the Mac local folder as default or as you've set. Just go to the File menu of the program and select "Open Export Folder" to quickly access to the file folder you've saved your iPhone photos. Besides, this software also enables you the ability to download many other kinds of files from iPhone to Mac, such as, podcasts, voice memos, music, movies, etc. Try it out for yourself now!


