iPubsoft Studio provides
Professional PDF Converter, ePub Creator and iPad/iPhone/iPod Tools
How to Recover Photos & Videos Deleted from Galaxy Nexus?

Nov 26, 2013 10:23 am / Posted by Sebastiane Alan to Android Tips
Follow @Sebastiane Alan
Thanks to the built-in high-end camera, Galaxy Nexus brings you with wonderful experience in taking photos and recording videos. Videos capture the wonderful moments and photos record the details of life. There won’t be a second chance for you to take or make them, and there may not be easy to find the same pictures or videos to save or download. As a result, it’ll be extremely important to protect these files well against data loss.
However, to one's annoyance, the fact is that the more you cherish the things that matter the farther from your instead. What if something goes wrong that make the data lost unexpectedly? You know there are various reasons, known or unknown, can result in a data loss problem, such as accidently deleting, system crash, virus infection, lost your device and so on. What's worse, you haven't make any backup of these videos and photos at all!
If it does happen, don't panic! There is still a big chance to get the deleted files recovered. All you need is the iPubsoft Android Data Recovery (for Windows 8/7/XP) or iPubsoft Android Data Recovery for Mac (Mac OS X 10.9 or later), which is not only an effective photo & video recovery program to help you get them back, but also you can use it to regain music, apps, contacts, messages, etc. from Galaxy Nexus and other Android-based devices easily.
Read the tutorial below and follow it to recover your precious photos and videos deleted from Samsung Galaxy Nexus. First, you can download the free trial version from the buttons below.


How to Retrieve Deleted Pictures and Videos from Galaxy Nexus?
Free download the right version of the data recovery software according to the computer system you are runing. Here, we will take Windows version as an example. Mac owners can also follow the same steps as follows:
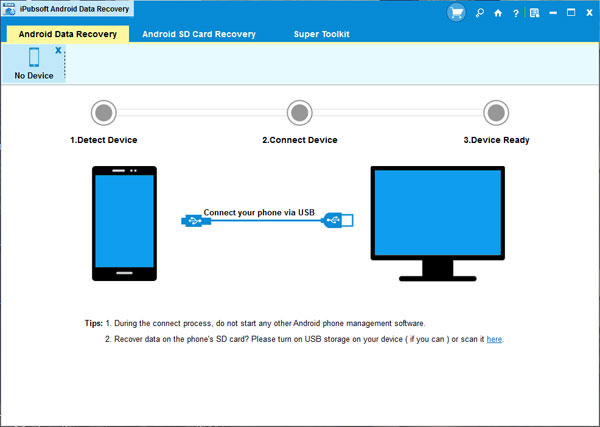
Step 1: Connect your Galaxy Nexus to the computer
After downloading and installing the software on your computer, you can use a USB cable to connect your Galaxy Nexus to the same computer directly. Or you can take out the SD card from your phone and use a card reader to plug the card into the computer because photos and videos are generally saved in the SD card.
Step 2: Enable USB debugging on your LG Optimus
You need to enable USB debugging on your phone before the scan. If you did it before, you can skip to the next step.
(1) For Android 2.3 or earlier: Enter "Settings" < Click "Applications" < Click "Development" < Check "USB debugging".
(2) For Android 3.0 to 4.1: Enter "Settings" < Click "Developer options" < Check "USB debugging".
(3) For Android 4.2 or newer: Enter "Settings" < Click "About Phone" < Tap "Build number" for several times until getting a note "You are under developer mode" < Back to "Settings" < Click "Developer options" < Check "USB debugging".
Once the USB debugging is enabled, click "Allow" on your phone to allow the program super user authorization when an Superuser Request pops up.
Step 3: Scan for deleted files on your LG Optimus
After you set the USB debugging, the program will detect your phone automatically and perform a quick san on it. When the scan finishes, all files contained in the phone will be scanned out and displayed in categories, including deleted photos, videos and more. You can preview them here in thumbnails.
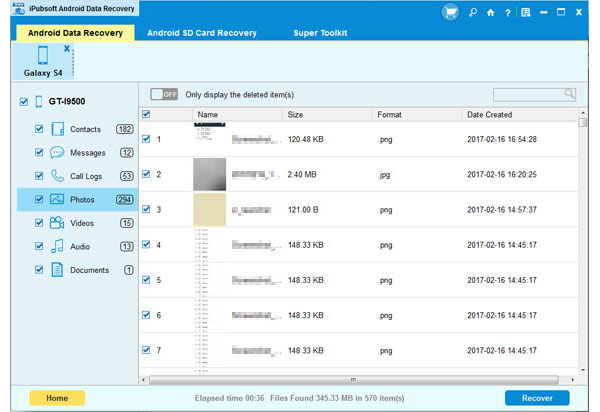
Step 4. Retrieve the selected photos and movies
Mark the pictures and videos you want to recover and click the button of "Recover". A "Path" dialog will pop up, asking you where you want to save the recovered files. Specify an output location and then the recovery process will begin.
You'd better choose another place on your computer or external storage device as the output location instead of the phone where you lost them before, for safety consideration.
Recommendation

Hot Articles
- Recover Data from Hard Drive
- Recover iPhone Messages
- Retrive Lost Photos
- USB Drive Data Recovery
- Recover Deleted Email Files


