iPubsoft Studio provides
Professional PDF Converter, ePub Creator and iPad/iPhone/iPod Tools
How to Sync Android Devices to Computer (PC & Mac)?

Aug 30, 2013 14:55 pm / Posted by Sebastiane Alan to Android Tips
Follow @Sebastiane Alan
If it is in the past, losing or breaking an Android phone means you have to lose or abandon all you valuable data you stored on the phone. But with the software technology marched on, there are various ways available for you to prevent data losing from your Android phone. In this article, we don't tell you how to recover lost data from Android phone, we want to show you how to backup everything on your Android phone or Android tablet to computer beforehand. We should tell you that backup is the best method to protect your private information on a phone.
To sync your Android phone with a computer, you can depend on Android Desktop Manager (Windows)or Android Desktop Manager for Mac, which is an efficient Android backup & restore tool that is able to make a safe and total backup of all your Android phone items, so that you can easily restore the backed up files to any Android device whenever you want. With the help of the desktop Android Sync Manager, you can backup contacts, text messages, photos, videos, music, apps, documents and more from Android device to PC or Mac.
Since Android Desktop Manager is specially designed for Android users, it is almost compatible with all popular Android brands, including Samsung, HTC, LG, Sony, Google, Motorola, ZTE, Huawei and so on. Just follow us to see how to backup your Android device to computer in a few mouse clicks.


Handy Tutorial for Syncing Android Phone to Computer
Next, we would like to focus on the Windows version. The operations are same on the Mac platform.
Step 1: Connect your Android phone via USB cable
Firstly, install and run the Android Sync Manager on your computer, then you can connect your Android phone to the computer via USB cable. Turn on the USB debugging mode on your Android phone. There are three way to do so:
(1) For Android 2.3 or earlier: Enter "Settings" < Click "Applications" < Click "Development" < Check "USB debugging".
(2) For Android 3.0 to 4.1: Enter "Settings" < Click "Developer options" < Check "USB debugging".
(3) For Android 4.2 or newer: Enter "Settings" < Click "About Phone" < Tap "Build number" for several times until getting a note "You are under developer mode" < Back to "Settings" < Click "Developer options" < Check "USB debugging".
Once the USB debugging is enabled, click "Allow" on your phone to allow the program super user authorization when an Superuser Request pops up.
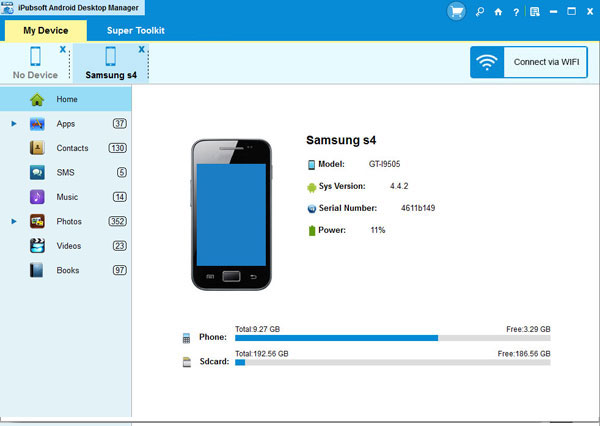
Step 2: Analyze and scan your Android data
The program will automatically scan your Android device and display all your Android data in categories, such as Contacts, SMS, Photos, Videos, Music, Apps, etc. Preview and select the files you want to transfer.
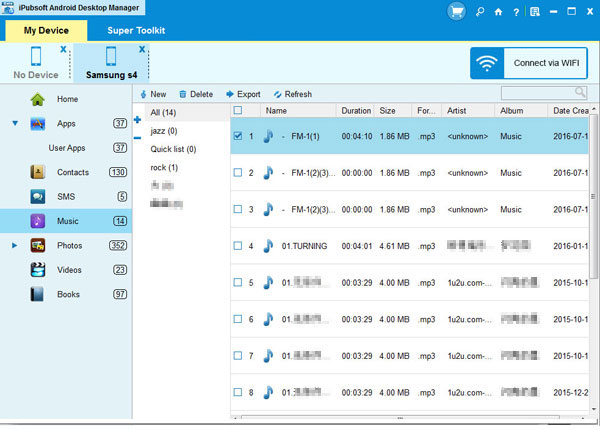
Step 3: Sync Android files to computer
Check the items you would like to sync to the computer by marking the checkbox in front of them. Then, press the "Export" button from the tool bar to save them to your computer.
Now, it's your turn! Just experience its powerful features for free by clicking the following button.
Recommendation
Hot Articles
- Recover Data from Hard Drive
- Recover iPhone Messages
- Retrive Lost Photos
- USB Drive Data Recovery
- Recover Deleted Email Files


