iPubsoft Studio provides
Professional PDF Converter, ePub Creator and iPad/iPhone/iPod Tools
How to Lost/Deleted Files from Internal Memory on Android?

Oct 15, 2014 2:37 pm / Posted by Sebastiane Alan to Android Tips
Follow @Sebastiane Alan
"I like the camera of my Samsung Galaxy S4 because it is good enough to take as much as high pixel photos for me. But unfortunately that my naughty nephew deleted the whole album. What's worse, I hadn't backed up all my Samsung phone photos to my computer. It can be a disaster for me because these photos are meant a lot. What am I supposed to do? Is there any possibility to get these photos back to me? I appreciate for all suggestion!"
The storage places in an Android phone can be divided into two parts, internal memory card and external SD card. Photos taken by the phone itself can be saved and located in the internal memory card. That's the main reason why recovering lost data from Android device can't be so easy. As we know, most data recovery programs are only support recovering data from external memory card. We must find out an one-shop Android data recovery program that can restore lost files from both internal and external memory cards.
iPubsoft Android Data Recovery (for Windows 8/7/XP/Vista)or iPubsoft Android Data Recovery for Mac (Mac OS X 10.9 or later) is especially designed to solve your problem. It allows you to scan and preview your lost data from internal memory, as well as the external SD card, including photos, videos, contacts, text messages, and more. Now, read on and follow the step by step guide to recover lost data from Android internal memory with this magic program.
Android Data Recovery works on Samsung, HTC, LG, Motorola and many more popular Android devices. You can download the free trial version of it now, and try it to recover your lost data from internal memory of an Android phone.


Guide to Retrieve Deleted Files from Android SIM card
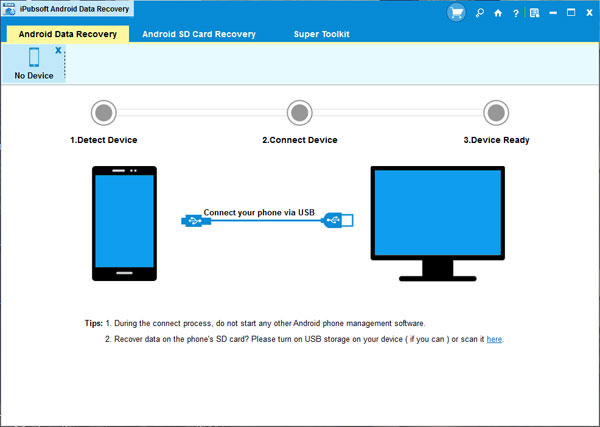
Step 1: Connect your Samsung phone to the computer
After installing the Android SIM Card data recovery on your computer, launch it and you can get the main program interface like below. You are asked to connect your Android phone to the computer with USB cable.
Step 2: Enable USB debugging on your phone
After connecting your Android device to the computer, you need to enable USB debugging on this device. The instructions on the interface will tell you how to make it. If you did it before, you can skip to the next step.
(1) For Android 2.3 or earlier: Enter "Settings" < Click "Applications" < Click "Development" < Check "USB debugging".
(2) For Android 3.0 to 4.1: Enter "Settings" < Click "Developer options" < Check "USB debugging".
(3) For Android 4.2 or newer: Enter "Settings" < Click "About Phone" < Tap "Build number" for several times until getting a note "You are under developer mode" < Back to "Settings" < Click "Developer options" < Check "USB debugging".
Once the USB debugging is enabled, click "Allow" on your phone to allow the program super user authorization when an Superuser Request pops up.
Step 3: Preview and retrieve data from Android internal memory
After the USB debugging, the program will automatically scan your phone and you can preview all your deleted data in window. Preview those files and find which one you desire to recover. Start the recovery process by clicking "Recover" button.
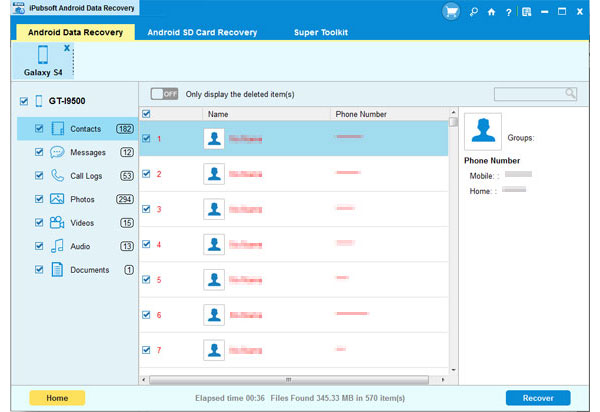
Tips: Deleted and existing files are all able to be scanned. The deleted files will be displayed in red, which distinguishes from existing files that are displayed in black.
Recommendation

Hot Articles
- Recover Data from Hard Drive
- Recover iPhone Messages
- Retrive Lost Photos
- USB Drive Data Recovery
- Recover Deleted Email Files


