iPubsoft Studio provides
Professional PDF Converter, ePub Creator and iPad/iPhone/iPod Tools
Easy Ways to Shrink PDF File Size on Mac

Mar 7, 2013 5:12 pm / Posted by Elime Mitchell to PDF Topics
Follow @Elime Mitchell
As a reliable file format to store and share information, PDF has been widely used nowadays in daily life and work. In most industries, most files now have been created as PDF documents. I am prepared to bet that there are more or less some PDF documents saved in your computer.
As we know, PDF files usually turn out to be bulky in terms of storage. Sometimes you might come across with the dilemma that can't upload a PDF file to the Web for sharing or email the file as an attachment because of the big size. Then, why not try to shrink PDF files to make the large-sized document more easy-to-share? This article here rightly introduces some ways for you to shrink PDF file size on Mac. Read on!
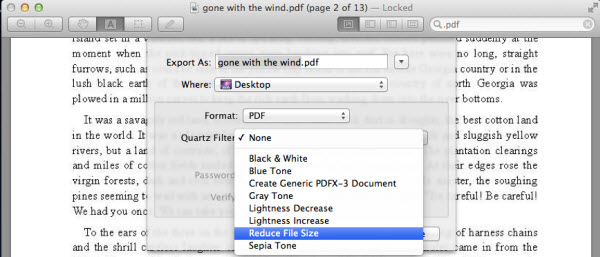
Solution 1: Using Macintosh Preview
Preview is a program commonly used for displaying images and PDF files on Mac. Besides helping to open and view PDF, this Mac OS X's app also enables the function to help users in need to shrink PDF file size on Mac. To get the task, you need to open the PDF in Preview first, followed by choosing "File -> Save as" or "File -> Export" (the former for Leopard or Snow Leopard, and the later for Lion users) to bring up a small windows, and then select Reduce File Size from the Quartz Filter drop-down list.
Solution 2: Adobe Acrobat
Actually, to deal with PDF files, Adobe Acrobat would be the most available solution you should not miss. So, if you have already have the Adobe Acrobat on your Mac and want to shrink PDF file size on Mac, then you can immediately make use of this official program given by Adobe. It is quite easy that you only need to open the PDF with the Acrobat, click "Choose Document" from the main menu and scroll to Save As... to select "Reduced Size PDF".
Solution 3: Re-create PDF File to Reduce File Size
If you have tried the above two solutions and not so satisfied with the shrunk PDF file for the blurred text, images, etc., then you can try to make PDF files smaller on Mac by recreating the PDF. In order to re-create PDF files with images or graphics, converting to PDF to Word docx first would be a best choice. Later, you can simply use the Microsoft Word 2007 and 2010, LibreOffice, or a PDF Printer on your Mac to re-create the PDF. The detail solutions are just as below shown.
Step 1: Download and install iPubsoft PDF to Word Converter for Mac. Run it on the Mac.
![]() Click Here to Free Download PDF to Word Converter for Mac
Click Here to Free Download PDF to Word Converter for Mac
Step 2: Click "Add File" to load PDF files, hit "Browse" to define an output, and then click "Start" to convert PDF to Docx.
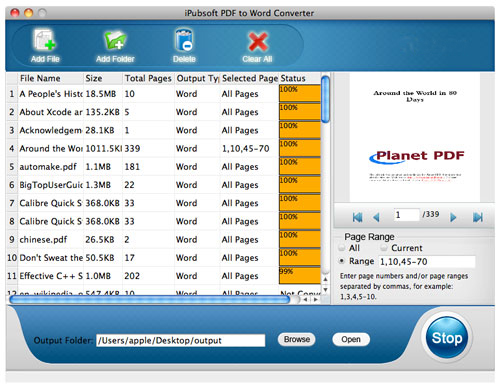
Hints: This program enables you to batch convert PDFs to Word DOCX files at one go effectively.
Step 3: Open the output DOCX file with Microsoft Word 2007/2010, LibreOffice, or a PDF Printer to save it as PDF file. If you want to turn the batch of converted Word DOCX files to PDF in a blink, the iPubsoft Word to PDF Converter for Mac would do you a favor with leisure.
Well, all the solutions of how to shrink PDF files are finished here. If you want to shrink PDF file size on Mac with high preservation of the original PDF quality, then you are highly recommended to try the third solution. Among all the above mentioned three ways, re-creating the PDF file would be the best way to retain the original PDF quality while reducing the file size.
Recommendation
Hot Articles
- View PDF in Web Browser
- Remove PDF Restrictions
- Print Secured PDF Files
- Add PDF to iPad Mini
- Combine JPEGs into PDF


