iPubsoft Studio provides
Professional PDF Converter, ePub Creator and iPad/iPhone/iPod Tools
Easy Way to Backup iPad Air iTunes U to Computer

January 17, 2013 5:03 pm / Posted by Sebastiane Alan to iDevice Tips
Follow @Sebastiane Alan
Question: Hi, I have downloaded many iTunes U materials on my iPad Air. Who will know how to transfer them to my computer for backup? I appreciate all your advices.
iTunes U is a service created by Apple to manage, distribute and control access to educational audio and video content for students in a college or university. It has collected materials from a variety of locations around the world. However, download too many iTunes U materials will take much memory space of iPad. That's why so many people are looking for a solution to transfer iTunes U from iPad to computer for backup.
It is easy to copy iPad iTunes U to PC as long as you have a reliable iPad iTunes U to PC transferring program. iPad to Computer Transfer is just such software which can help you export iPad iTunes U, as well as videos, audio, photos, books, playlists, podcasts, camera roll, etc. to computer fast and easily. If you want to learn more about the program, you can read on and the below is the detailed guide showing you how to transfer iTunes U from iPad to PC with this software.
Detailed Guide on How to Copy iPad Air iTunes U to Computer
Firstly, you should Download the iPad to Computer Transfer through the below buttons according to your computer system. Mac version is also available for transfer iPad to Mac.


Step 1: Connect your iPad to the computer
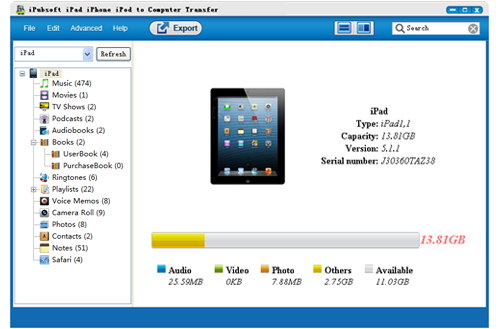
Install the recommended program on your computer. Launch it to get ready. Connect your iPad to the computer via the data cable. Once it is connected, you can see all iPad items are listed in the left panel of the program.
Step 2: Select the iTunes U to transfer
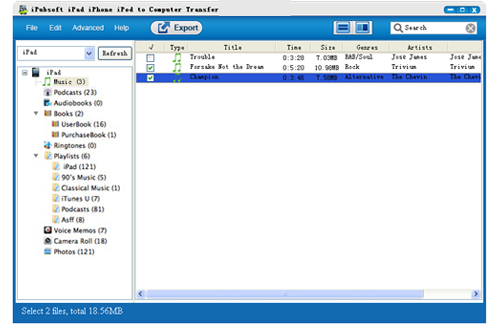
Click the item of "iTunes U" and you can see all downloaded iTunes U showing in the program interface. Just choose your favorite files that you want to transfer to your computer, make them checked.
Step 3: Click to begin the transference
Click Advanced > Options to select an output folder for saving the exported iTunes U files. After that, you can hit on the icon of ![]() from the top menu to start the transference.
from the top menu to start the transference.
When the transfer is done, a window will show up asking you if you want to open the output folder. You can just click "Yes" to view the exported files directly. That's all!
![]() Download iPad to Computer Transfer Free Trial Version >>
Download iPad to Computer Transfer Free Trial Version >>
Hot Product

Hot Articles
- Transfer Video from iPad to PC
- Transfer iPhone Music to PC
- Copy iPod Photos to Computer
- Transfer iPhone Ebooks to Mac
- Export iPad Photos to Mac


