iPubsoft Studio provides
Professional PDF Converter, ePub Creator and iPad/iPhone/iPod Tools
How to Create iPhone Ringtones from iPod Music?

January 28, 2013 2:03 pm / Posted by Sebastiane Alan to iDevice Tips
Follow @Sebastiane Alan
Most iPhone owners ask me why the songs play smoothly on iPod but they are unable to use them as iPhone ringtones. The reason is that the format of an iPod song is incompatible with music format that iPhone required for ringtones. If you want to use iPod music as ringtones for iPhone, you should use third-party software and native system applications. Read on this article to see how to create iPhone ringtones from the music you have stored on your iPod.
Step One: Transfer your iPod Music to Computer
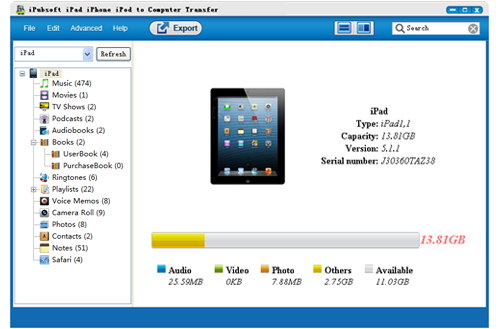
First of all, you should copy songs from your iPod to computer by using a third-party program called iPubsoft iPod to Computer Transfer. Connect your iPod to your computer, select it from iPod to Computer Transfer's main interface, choose the music that you want and click the "Export" button. Choose your iTunes music folder as the destination for the transferred iPod music.
Step Two: Convert iPod Songs to iPhone Ringtone format
We know many phones use ringtones in the format of MP3, but iPhone apply ringtones in M4R format. So next, you need to convert iPod music to M4R format for iPhone. Here you can use iTunes and the tools in your computer's operating system to achieve this conversion. Just choose a music file you want to turn into an iPhone ringtone from the iTunes library, adjust your "Import Settings" so that the iTunes encoder is set to AAC format. Select a 40-second maximum sample of the song you need and navigate to the Options tab from the song's info panel, mark it in the "Start Time" and "Stop Time" fields.
Click "Advanced" -> "Create AAC Version" to launch the encoder to create a file that only includes the songs part you mark in the start and stop time fields. You can locate the shortened file on your computer's hard drive by selecting "File" -> "Show in Windows Explorer". The last thing is to right-click on the shortened file in Windows Explorer, change the ".m4a" extension into ".m4r", select "Rename" and typing in the "r" in place of the "a". Delete the file back in iTunes but select the "Keep File" option from the dialog box that appears, and drag the .m4r file from Windows Explorer into iTunes.
Step Three: Add Converted Ringtone Songs to iPhone
After you finish the most difficult part of converting the songs format showing in the step two, you can connect your iPhone to your computer and sync the created M4R file from the "Ringtones" library in iTunes to your iPhone device. Disconnect your iPhone from the computer once the transference has finished.
Step Four: Set the Songs as iPhone Ringtone
Open the "Settings" app on your iPhone, tap the buttons of "Sounds" -> "Ringtone" and select the "Custom" option. Click your converted song and set it as the ringtone for your iPhone. Done!
Hot Product

Hot Articles
- Transfer Video from iPad to PC
- Transfer iPhone Music to PC
- Copy iPod Photos to Computer
- Transfer iPhone Ebooks to Mac
- Export iPad Photos to Mac


